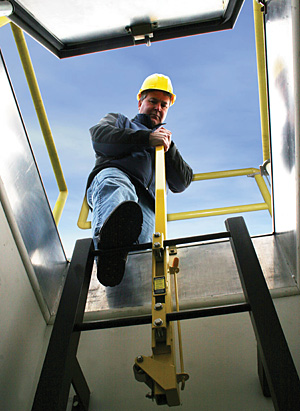
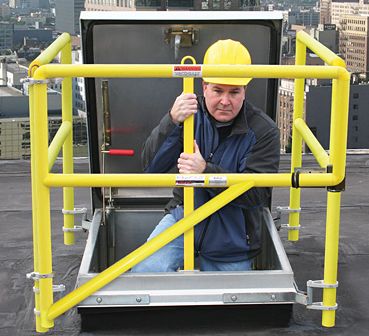
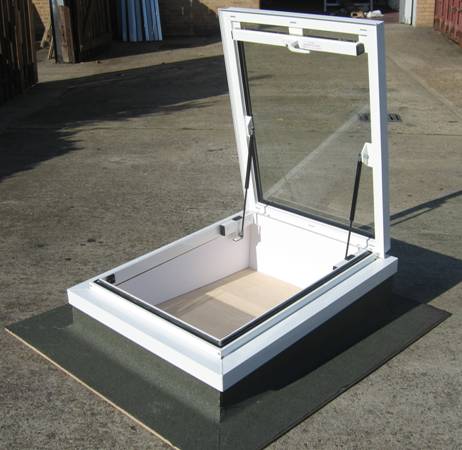
Roof hatches are utilized for access to the roof from a ladder inside the building. The roof hatch can be utilized by the building owner and his or her maintenance personnel regarding items like HVAC unit repair, roof repair, etc. Roof hatches almost always open upwards and come with a host of options:
-Hold-open lock arm hinges

-cover lift assist

-rubber gasketing

-insulation

-various material types (galvanized G90 steel, aluminum, stainless steel)


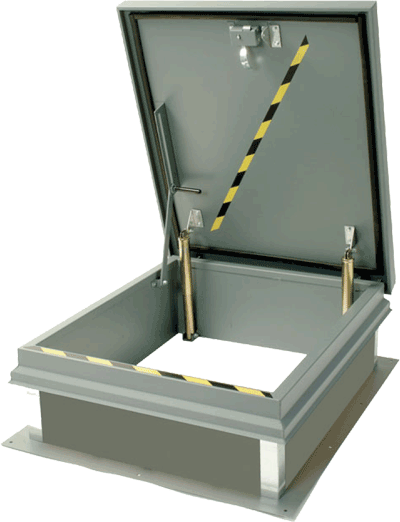
-capflashed curb

-mounting flange

-padlock

-safety post
-rails
-self flashing
-skylight.
Also many hardware choices can be available.
Following are some of the most common types available:
Thermally Broken Roof Hatch –

A thermally broken roof hatch is insulated and has a low thermal conductivity barrier keeping heat or cold from transferring thermally through the hatch and into the building. Also, condensation is reduced and efficiency is maximized with thermally broken roof hatches. Thermally broken roof hatches are most ommonly available in aluminum or powdercoated finish.
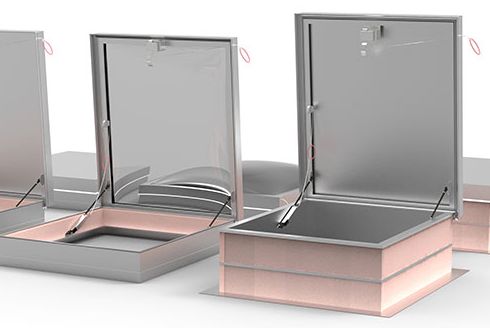
Equipment Access Roof Hatch –

An equipment access roof hatch is typically very large, with two swinging leafs Materials available are typically G90 galvanized steel, aluminum, Stainless Steel with hollow metal insulated covers. A mounting curb will commonly come integral with the unit.
36″ x 30″ Roof Hatch – One of the most commonly utilized sizes of roof hatch, utilized with the choice of most of the common options and hardware and with standard ladder access.
36″ x 36″ Roof Hatch – One of the more commonly utilized sizes of roof hatch, utilized with the choice of most of the common options and hardware and with standard ladder access.
48″ x 48″ Roof Hatch – 48″ square roof hatches are utilized for situations where a 30×36 or 36×36 roof hatch won’t suffice. These hatches are utilized if getting larger equipment up and down from the roof is expected either during construction or during the life of the building. Utilized with the choice of most of the common options and hardware and with standard ladder access.
30″ x 96″ Roof Hatch – These hatches are utilized where roof access will be required often as they are longer allowing better movement, maintenance, tools, equipment, and a common stairway or staircase.

Firstly the roof hatch opening must be framed for structural stability and an appropriate substrate for attachment. This may be done with reinforcing 2x material fastened vertically to the roof framing. If the hatch to be installed does not have an integral curb in the unit, a pressure treated wood curb will need to be built on top of the roof (framed and sheathed) at the appropriate length, width, and height per the hatch installation documents.

Then the hatch is placed on the roof most commonly from the exterior with the use of a crane or a boom lift of some kind.
Once the hatch is on the roof, it must be fastened to the roof/hatch framing often by way of a flange at the very bottom of the unit/curb.
Long screws are typically used (4-8″ depending on the 2x substrate available). Once the hatch is fastened, it is commonly flashed with asphalt cement both several inches up the curb and several inches past the edge of the flange onto the roof.

Then a foam, plastic, or wood cant strip is placed around the perimeter of the curb/roof joint. The cant strip is also completely covered in bituminous material along with all vertical surfaces of the curb and to several inches past the edge of the flange on the roof.

Then a base sheet of sheet rubber material is wrapped around the entire curb, cant strip, and onto the roof. Then the final sheet rubber or asphaltic roof material is adhered on the entire vertical curb substrate. Any joints are caulked or filled with asphaltic material to keep out moisture. Roof hatches will need to be ordered early allowing ample time to have them while the roof is being installed, as an important piece of the building ‘dry-in’ step. Temporarily closing off a hatch opening while waiting for the product to arrive can be an undesirable added cost and a maintenance/moisture problem.
